
Viper Car Starter Manual: A Comprehensive Guide (Updated 10/03/2026)
This manual details the Viper 7652V‚ 7652X‚ and 7652P systems‚ covering security‚ remote start‚ and keyless entry features.
Viper car starters represent a leading edge in vehicle security and convenience‚ offering remote start‚ keyless entry‚ and comprehensive alarm systems. Directed Electronics‚ the manufacturer‚ provides a range of Viper systems – including the popular 7652V‚ 7652X‚ and 7652P models – designed to enhance your driving experience and protect your investment.
These systems go beyond simple remote engine activation; they integrate advanced features like smartphone control via Viper SmartStart (on compatible models) and customizable settings for optimal performance. Understanding your specific Viper system is crucial for maximizing its benefits. This manual serves as a detailed guide‚ providing step-by-step instructions and troubleshooting advice to ensure seamless operation and long-term reliability. Proper installation and configuration are key to unlocking the full potential of your Viper car starter;
Understanding Your Viper System: Models & Features
Viper offers a diverse lineup of car starter systems‚ each tailored to different needs and vehicle types. The 7652V‚ 7652X‚ and 7652P represent popular choices‚ sharing core functionalities but differing in specific features and compatibility. Common features include remote start‚ allowing pre-heating or cooling of your vehicle‚ and a robust security system to deter theft and vandalism.
Keyless entry provides convenient door locking and unlocking‚ while advanced models may offer smartphone control through the Viper SmartStart app. Understanding the specific features of your model – as detailed in the owner’s manual available on ManualsLib – is essential. This includes knowing the range limitations of the remote‚ the bypass module requirements‚ and the available customization options. Proper system knowledge ensures optimal performance and security.
Popular Viper Models (7652V‚ 7652X‚ 7652P) ー Feature Comparison
The Viper 7652V‚ 7652X‚ and 7652P models share a foundation of remote start and security features‚ but subtle differences cater to varied preferences. The 7652V is a core offering‚ providing reliable remote start and essential security. The 7652X typically adds enhanced range and potentially additional security features like a louder siren.
The 7652P often includes priority override functionality‚ allowing you to regain control of the vehicle even after a remote start command. All three models benefit from compatibility with a bypass module‚ crucial for modern vehicles with immobilizer systems. Referencing the Directed Electronics documentation on ManualsLib is vital for a detailed comparison‚ ensuring you select the model best suited to your vehicle and security needs.
Key Features: Remote Start‚ Security‚ Keyless Entry
Viper systems excel in three core areas: convenient remote start‚ robust security‚ and effortless keyless entry. Remote start allows pre-warming or pre-cooling your vehicle‚ enhancing comfort in extreme temperatures. Security features‚ including alarms and potentially immobilizers‚ deter theft and protect your investment. Keyless entry provides lock and unlock functionality without needing a physical key‚ adding convenience and security.
These features work synergistically; for example‚ remote start often requires security disarming. Understanding how these features interact‚ as detailed in the Viper 7652V owner’s manual available on ManualsLib‚ is crucial for optimal system utilization. Proper configuration and understanding of each feature maximize both convenience and vehicle protection.

Installation & Initial Setup
Proper installation is vital for optimal performance; choose between professional installation for reliability or DIY‚ carefully considering wiring diagrams and color codes.
Professional Installation vs. DIY Considerations
Deciding between professional installation and a do-it-yourself (DIY) approach for your Viper car starter requires careful consideration. Professional installation‚ performed by a certified technician‚ guarantees proper wiring‚ system configuration‚ and compatibility with your vehicle’s existing electronics. This minimizes the risk of errors that could damage your car or compromise the system’s functionality.
However‚ professional installation comes with a cost. DIY installation‚ while more affordable‚ demands a strong understanding of automotive electrical systems‚ wiring diagrams‚ and the Viper system’s specific requirements. Incorrect wiring can lead to frustrating issues‚ void warranties‚ or even cause vehicle malfunctions. If you lack experience‚ professional installation is strongly recommended. Thoroughly research and choose a reputable installer specializing in Viper systems for the best results.
Wiring Diagrams & Color Codes (General Overview)
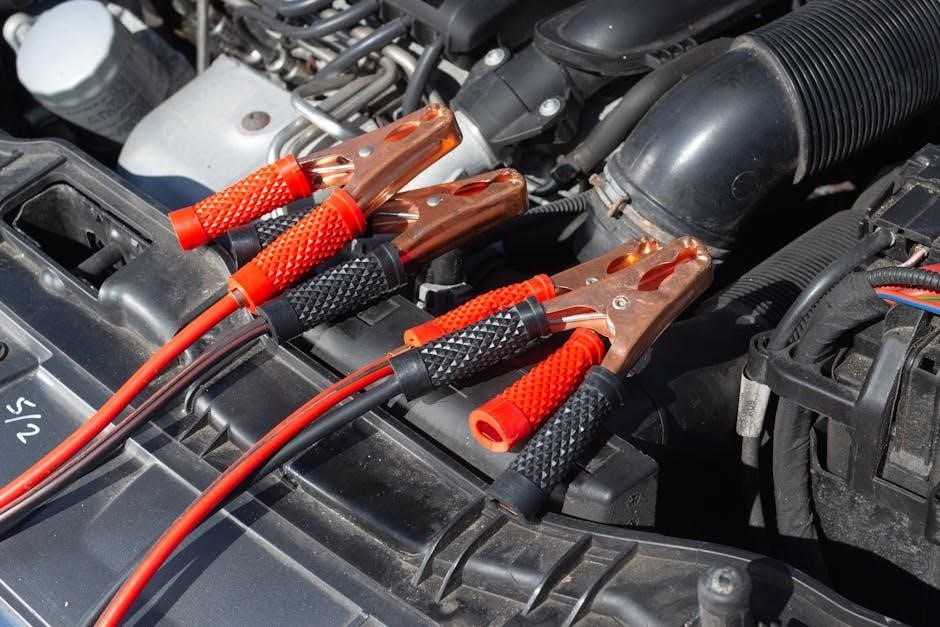
Viper car starter installation relies heavily on accurate wiring and understanding color codes. While specific diagrams vary significantly by vehicle make and model‚ some general principles apply. Common wires include a 12V constant power source (typically yellow)‚ ignition power (often white or pink)‚ accessory power (usually blue)‚ starter wire (often yellow with a stripe)‚ and ground (black).
Refer to your vehicle’s wiring diagram and the Viper system’s installation guide for precise color codes. The bypass module requires connections to the vehicle’s immobilizer system‚ which can be complex. Incorrect wiring can disable essential vehicle functions or damage the system. Always double-check connections and use proper crimping or soldering techniques for secure and reliable connections. Professional diagrams are crucial for successful installation.
Operating Your Viper System
Effectively utilize remote start‚ security‚ and keyless entry features with this guide. Understand range limitations and bypass module functions for optimal performance.
Remote Start Operation: Step-by-Step Guide
Initiating remote start is straightforward. First‚ ensure the vehicle is parked in a safe location and the parking brake is engaged. Press the remote start button – typically marked with a car icon and an arrow. The system will verify vehicle readiness.

Confirmation is key. A short beep from the horn‚ or illuminated dash lights‚ confirms activation. If the vehicle doesn’t start‚ check the hood is closed and the brake pedal isn’t pressed. Some models require a momentary press‚ then a hold of the button.
Extended run-time is available. The system may automatically shut off after a pre-set duration. Refer to your system settings for customization options. Always remain within range and aware of your surroundings when using remote start.
Understanding Remote Start Range & Limitations
Remote start range varies depending on the Viper model and environmental factors. Generally‚ expect a functional range of 500-1500 feet in open areas. However‚ buildings‚ trees‚ and radio frequency interference significantly reduce this distance.
Several limitations apply. The system won’t operate if the hood is open‚ a door is ajar‚ or the vehicle’s alarm is triggered. Low vehicle battery voltage can also prevent starting. Ensure the parking brake is firmly engaged for safety.
SmartStart enhances range. Utilizing the Viper SmartStart app (if equipped) provides control beyond the remote’s limitations‚ leveraging cellular connectivity for virtually unlimited range.
Bypass Module Functionality & Compatibility
A bypass module is crucial for modern vehicles with sophisticated security systems. It allows the Viper system to start the engine without disabling factory anti-theft features like immobilizers. These modules “bypass” the normal starting sequence‚ mimicking a key turn.
Compatibility is key. Not all bypass modules work with every vehicle. Selecting the correct module—based on your car’s year‚ make‚ and model—is essential for proper function. Incorrect modules can cause starting issues or system malfunctions.
Professional installation recommended. Bypass module installation requires specific wiring knowledge and can be complex. A qualified installer ensures correct connection and programming for optimal performance and vehicle safety.
Security System Features
Viper systems offer robust protection through features like alarm triggers‚ system arming/disarming‚ and a convenient valet mode for temporary security adjustments.
Arming & Disarming the Security System
Arming your Viper security system is crucial for vehicle protection. Typically‚ this is achieved by pressing the lock button on your remote multiple times‚ often three times within a specific timeframe. Confirmation is usually indicated by a flashing LED or an audible chirp.
Disarming the system requires entering your valid disarm code using the remote‚ or utilizing the keyless entry function if equipped. Failure to disarm correctly will trigger the alarm. Remember to consult your specific model’s manual for precise arming/disarming sequences‚ as they can vary.
Understanding the system status is vital; a consistently flashing LED may indicate a fault or open zone. Always ensure all doors‚ hood‚ and trunk are securely closed before arming to prevent false alarms.
Understanding Alarm Triggers & Responses
Viper security systems are designed to react to various intrusion attempts. Common triggers include forced entry via doors‚ hood‚ or trunk‚ as well as shock or motion detection. The system responds by activating the siren‚ flashing the vehicle’s lights‚ and potentially immobilizing the starter.
Understanding trigger zones is key; a single trigger may activate multiple responses. Some systems offer adjustable sensitivity settings for shock sensors to minimize false alarms. Upon activation‚ the system typically enters a “valet override” mode‚ requiring disarming via the remote or keyless entry.
Investigate any alarm activation promptly to assess potential damage or theft attempts. Familiarize yourself with your system’s specific trigger patterns and responses for effective security;
Valet Mode: Temporary Security System Disablement
Valet Mode temporarily disables select security features‚ ideal when your vehicle is being serviced or parked in a secure location. This prevents accidental alarm triggers during maintenance or while the car is attended. Activation typically involves a specific key fob sequence‚ often holding both lock and unlock buttons simultaneously.
When engaged‚ features like shock sensors and door triggers are bypassed‚ while remote start functionality may remain active. Remember to disengage Valet Mode upon retrieving your vehicle to restore full security protection. The system usually confirms activation/deactivation with a visual or audible signal.
Consult your specific model’s manual for the precise Valet Mode procedure‚ as it can vary between Viper systems.

Troubleshooting Common Issues
This section addresses frequent problems like remote malfunctions‚ start failures‚ and alarm issues‚ offering reset procedures and diagnostic steps.
Remote Not Working: Battery‚ Range‚ Programming
If your Viper remote isn’t functioning‚ begin with the simplest checks. First‚ verify the battery isn’t depleted; a weak battery significantly reduces range and functionality. Replace it with a fresh one of the correct type.
Next‚ consider the range limitations. Obstacles like buildings or other vehicles can interfere with the signal. Ensure you’re within the specified operating distance. If the remote still fails‚ it may require reprogramming to re-establish communication with the vehicle’s system.
Consult your specific model’s instructions (7652V‚ 7652X‚ or 7652P) for the correct programming sequence. A reset of the system might also be necessary to resolve communication errors. If problems persist‚ professional assistance is recommended.
Car Not Starting After Remote Start Attempt
If your vehicle doesn’t start after using the Viper remote start‚ several factors could be at play. The most common issue is a problem with the bypass module‚ which is crucial for allowing the remote start to function. Ensure the module is correctly installed and compatible with your vehicle’s security system.

Check the vehicle’s parking brake; it must be firmly engaged for the remote start to operate. A low vehicle battery can also prevent starting. Verify the battery’s charge and consider a jump start if needed. Finally‚ confirm the system hasn’t entered valet mode‚ which disables remote start functionality.
Refer to your Viper 7652V/X/P manual for specific troubleshooting steps.
Alarm System Malfunctions & Reset Procedures
Experiencing alarm malfunctions with your Viper system can be concerning. Common issues include false alarms triggered by sensitivity settings or faulty door/hood sensors. First‚ disarm the system using your remote or key. If the alarm continues‚ try resetting the system by turning the ignition to the ‘on’ position (without starting the engine) for a few seconds‚ then back off.
Consult the Viper 7652V/X/P owner’s manual for specific reset procedures tailored to your model. If problems persist‚ check for loose wiring connections or sensor damage. A professional installation check is recommended for complex issues.
Remember to document any recurring malfunctions for your installer.
Advanced Features & Customization
Explore programming additional remotes and utilizing Viper SmartStart for smartphone control‚ alongside adjustable system settings like timer duration.
Programming Additional Remotes
Adding remotes to your Viper system expands convenience and security. The process generally involves a sequence of turning the ignition on and off‚ followed by pressing buttons on both the existing and new remote. Refer to your specific model’s manual (7652V‚ 7652X‚ or 7652P) for precise instructions‚ as the procedure can vary slightly.
Typically‚ you’ll initiate programming mode via a dedicated button or a combination of button presses on the control module. The system will then prompt you to transmit signals from each remote you wish to add. Successful programming is usually confirmed by a visual or audible signal – a flash of the parking lights or a chirp from the siren.
Important: Ensure the vehicle is in a well-ventilated area during programming. Always consult the official Directed Electronics Viper manual for detailed steps and safety precautions.
Smartphone Control via Viper SmartStart (if applicable)
Viper SmartStart enables remote control of your vehicle via a smartphone app. This feature‚ if equipped on your 7652V‚ 7652X‚ or 7652P system‚ requires a separate subscription service and a compatible SmartStart module installed during the initial setup.
Through the app‚ you can remotely start‚ lock‚ and unlock your car‚ check vehicle status‚ and receive notifications. The app provides a user-friendly interface for managing your vehicle’s security and convenience features from anywhere with cellular connectivity.
Activation and setup involve creating an account on the Viper SmartStart website and linking your vehicle’s system; Ensure your module has an active data connection for optimal performance. Detailed instructions are available on the Viper SmartStart website and within the app itself.
Adjusting System Settings (Timer Duration‚ etc.)
Your Viper 7652V‚ 7652X‚ or 7652P system allows customization of several settings to personalize your experience. These adjustments are typically made using the vehicle’s ignition key in a specific sequence‚ as detailed in the full owner’s manual.

Common adjustable settings include the remote start run-time duration – controlling how long the engine runs after activation. You can also modify the hood-open sensor duration‚ and configure auxiliary output settings if additional components are connected.
Carefully follow the programming instructions to avoid unintended changes. Incorrect settings can affect system functionality. Refer to the comprehensive manual for specific programming sequences and detailed explanations of each adjustable parameter. Always double-check your settings after making changes.