
Missouri Star Quilt Co. Binding Tutorials: A Comprehensive Guide
Missouri Star Quilt Co. provides extensive binding tutorials, featuring Jenny Doan’s clear instructions for both machine and hand binding. These resources simplify achieving professional quilt finishes!
Missouri Star Quilt Co. has become a cornerstone resource for quilters seeking accessible and comprehensive binding techniques. Their approach, largely spearheaded by Jenny Doan, emphasizes demystifying the process, making it achievable for quilters of all skill levels. The tutorials cover a spectrum of methods, from traditional machine binding to elegant hand binding, and even innovative approaches like self-binding.

A key element of their success lies in breaking down complex steps into easily digestible segments. Doan’s tutorials aren’t just demonstrations; they’re lessons in understanding why certain techniques work, empowering quilters to adapt and troubleshoot. The company also champions tools like the Debs Binding Tool, designed to streamline the process and improve accuracy.
These tutorials aren’t limited to a single style; they explore variations in binding widths and finishes, allowing quilters to personalize their projects. Furthermore, Missouri Star fosters a vibrant community where quilters share their experiences and finished projects, creating a supportive learning environment. The availability of free tutorials on platforms like YouTube further expands their reach and impact.
Jenny Doan’s Binding Tutorials: An Overview
Jenny Doan, the face of Missouri Star Quilt Co., is celebrated for her approachable and encouraging teaching style. Her binding tutorials are a cornerstone of the company’s success, renowned for their clarity and ease of understanding. Doan’s method focuses on building confidence, particularly for beginners, by breaking down each step into manageable components.
Her tutorials comprehensively cover both machine and hand binding, offering detailed demonstrations of techniques like mitering corners and joining binding strips. Doan frequently emphasizes the importance of accurate cutting and pressing for a professional finish. She doesn’t shy away from showcasing helpful tools, such as the Debs Binding Tool, explaining how they can simplify the process.
A hallmark of Doan’s approach is her emphasis on enjoying the quilting journey. She encourages experimentation and personalization, reminding quilters that imperfections are part of the handmade charm. Her tutorials are readily available on YouTube and the Missouri Star website, making them accessible to a global audience. She inspires quilters to share their creations on platforms like Quilts By Me.
The Debs Binding Tool and its Application
The Debs Binding Tool, designed by Deb Johnson, has become a popular accessory featured in Missouri Star Quilt Co.’s tutorials. This tool streamlines the process of creating and attaching quilt binding, particularly for machine binding. It’s designed to help quilters consistently create accurate and neat binding, reducing the time and effort required.
The tool works by holding the binding strip at a 45-degree angle, facilitating precise attachment to the quilt edge. Many quilters praise its ability to simplify mitered corners, a traditionally challenging aspect of binding. Jenny Doan frequently demonstrates its use in her tutorials, highlighting its user-friendly design and effectiveness.

Users report that the Debs Binding Tool is a “no brainer” and a significant time-saver. It’s particularly beneficial for those new to binding or those who struggle with achieving consistent results. While not essential, it’s a valuable addition to a quilter’s toolkit, offering a more efficient and enjoyable binding experience, as showcased by Missouri Star.
Benefits of Using the Debs Binding Tool
Employing the Debs Binding Tool, as demonstrated in Missouri Star Quilt Co. tutorials, offers several key advantages for quilters. Primarily, it significantly simplifies the binding process, making it faster and less prone to errors. The tool’s consistent 45-degree angle ensures accurate binding attachment, resulting in a professional-looking finish.
A major benefit is the ease with which mitered corners can be achieved. Traditionally a point of frustration for many quilters, the Debs Tool streamlines this step, creating clean and precise corners every time. This is particularly helpful for beginners or those seeking a more polished result.
Furthermore, the tool promotes consistency, ensuring uniform binding width and a neat appearance around the entire quilt. Many users attest to its time-saving qualities and overall improvement in their binding technique. It’s a worthwhile investment for quilters looking to enhance their skills and enjoy a more efficient quilting experience, as highlighted by Jenny Doan’s tutorials.
Materials Needed for Missouri Star Binding
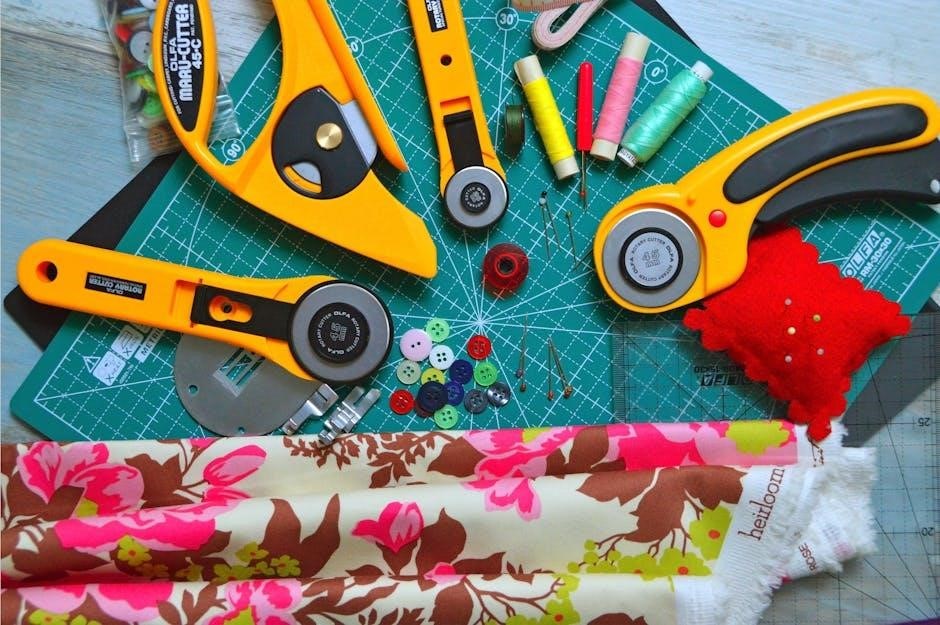
To successfully follow Missouri Star Quilt Co.’s binding tutorials, gathering the correct materials is crucial. First, you’ll need binding fabric – typically 2.5 inches wide strips, cut on the bias or straight of grain depending on your preference and quilt design. The amount required depends on the quilt’s perimeter.
Essential tools include a rotary cutter, mat, and ruler for precise fabric cutting. A sewing machine, thread matching your binding fabric, and pins or clips are also necessary. For machine binding, a walking foot can be incredibly helpful for even fabric feed.
If utilizing the Debs Binding Tool, ensure you have that readily available. For hand binding, a binding needle and thread are required. Scissors for trimming and a seam ripper for correcting mistakes complete the list. Finally, an iron and ironing board are vital for pressing seams and achieving a crisp, professional finish, as demonstrated in Jenny Doan’s instructional videos.
Preparing Binding Strips: Cutting and Joining
Missouri Star Quilt Co. tutorials emphasize precise fabric preparation for successful binding. Begin by cutting binding strips, typically 2.5 inches wide, using a rotary cutter, mat, and ruler. Consistent width is key for a smooth finish.

Once cut, these strips need joining to create one continuous length sufficient for the quilt’s perimeter. Jenny Doan demonstrates a diagonal seam method, creating a less bulky join. To do this, place two strips right sides together at a 45-degree angle, and sew along the diagonal line.
Press the seam open to reduce bulk. Repeat this process until you have a long, continuous binding strip. Accurate cutting and careful joining are vital. A well-prepared binding strip ensures a professional-looking finish and simplifies the subsequent machine or hand binding steps, as highlighted in their comprehensive guides.
Machine Binding with Missouri Star Techniques
Missouri Star Quilt Co.’s machine binding tutorials focus on speed and efficiency. They advocate for using a consistent ¼ inch seam allowance throughout the process. Begin by attaching the binding to the quilt’s front, right sides together, leaving a tail at the beginning and end.
Jenny Doan demonstrates a technique where the raw edges of the binding are aligned with the quilt’s edge during initial stitching. After stitching around the entire quilt, join the binding ends using a diagonal seam, mirroring the strip joining method.
Next, flip the binding to the back of the quilt and hand-stitch or machine stitch it in place. Missouri Star often showcases machine stitching in the ditch, creating an invisible finish. Their tutorials emphasize maintaining a neat fold and consistent stitching for a polished, durable machine-bound quilt.
Step-by-Step Machine Binding Tutorial
Begin by joining binding strips to create one continuous length, using a diagonal seam for minimal bulk, as shown in Missouri Star tutorials. Press seams open. Attach the binding to the quilt’s front, right sides together, starting 12 inches from a corner, using a ¼ inch seam allowance.
Continue stitching around the quilt, stopping ¼ inch from each corner. Clip the corners diagonally and miter the binding at each corner, folding it neatly. Join the binding ends with another diagonal seam. Flip the binding to the back of the quilt.
Tuck and pin the binding in place, ensuring a neat fold. Machine stitch “in the ditch” from the front, catching the binding on the back. This creates a nearly invisible finish. Backstitch at the beginning and end to secure. Press the finished binding for a professional look, following Missouri Star’s guidance.
Hand Binding Techniques from Missouri Star
Missouri Star Quilt Co. demonstrates hand binding as a beautiful, traditional finish. Begin by attaching the binding to the quilt front using a machine, leaving sufficient length for turning. Fold the binding over to the back, concealing the raw edge, and pin securely.
Using a blind stitch, carefully hand-stitch the binding to the quilt back. A contrasting thread can be used for a decorative effect, or a matching thread for a subtle finish. Maintain consistent stitch length and tension for a professional appearance.
Pay close attention to mitering corners neatly, ensuring a crisp, clean look. Jenny Doan’s tutorials emphasize taking small, even stitches, and periodically pressing the binding as you work. This technique offers a personalized touch and a durable, heirloom-quality finish to your quilts, as showcased by Missouri Star.
Detailed Hand Binding Instructions
Missouri Star Quilt Co.’s hand binding instructions begin with preparing your binding strips – accurately cut and joined for a continuous length. Attach the binding to the quilt’s front, machine stitching close to the edge. Leave a tail at the beginning and end for joining.
Fold the binding over to the back, concealing the raw edge, and pin frequently. Employ a blind stitch, taking small, nearly invisible stitches through the binding and quilt backing. Consistent stitch length is crucial for a polished look.
At corners, carefully miter the binding, ensuring neat folds and precise stitching. Securely fasten the binding tails, hiding the joins. Jenny Doan stresses patience and practice for mastering this technique. Regularly press the binding as you stitch to maintain a flat, professional finish, resulting in a beautifully hand-bound quilt.
Understanding Binding Corners: A Key Skill
Mastering quilt binding corners is essential for a professional finish, and Missouri Star Quilt Co. dedicates significant instruction to this skill. The core principle involves creating neat miters that flow seamlessly around each corner of the quilt.
Begin by stopping your binding application ¼ inch from the corner. Fold the binding at a 45-degree angle, creating a crisp crease. Then, fold it back on itself, aligning the folded edge with the quilt’s side. This forms the miter.
Continue stitching the binding along the next side, carefully unfolding the miter and ensuring a smooth transition. Precise folding and pinning are vital. Jenny Doan emphasizes consistent pressure when pressing the corners to set the miter. Practice makes perfect; understanding this technique elevates your quilting projects significantly, resulting in clean, professional corners.
Achieving Mitered Corners for a Professional Finish
Missouri Star Quilt Co.’s tutorials highlight that perfectly mitered corners are the hallmark of a well-finished quilt. The key lies in precise folding and consistent stitching. After stopping ¼” from the corner, unfold the binding and create a 45-degree angle fold, pressing firmly to establish a sharp crease.
Next, fold the binding back on itself, aligning the folded edge with the quilt’s edge. This creates the mitered effect. Pin securely to maintain the shape during stitching. When resuming your stitching, ensure you catch the mitered fold precisely, creating a seamless transition.
Jenny Doan stresses the importance of a consistent ¼” seam allowance throughout the entire binding process, including the corners. Careful pressing after stitching further refines the miter, resulting in a polished, professional look. Mastering this technique transforms a good quilt into an exceptional one.
Alternative Binding Techniques Beyond Missouri Star
While Missouri Star Quilt Co. excels in streamlined binding methods, quilters often explore diverse techniques for unique finishes. One popular alternative is the French binding, which encases the quilt edge for a delicate, frameless look, requiring precise hand stitching.

Another option is the piped binding, adding a contrasting cord within the binding fabric for a decorative pop. This technique demands careful planning and execution to ensure the pipe remains centered and secure. Continuous binding, utilizing one long strip for all sides, minimizes bulk and seams, though it requires accurate fabric calculations.
Furthermore, some quilters prefer the rustic charm of a scalloped binding, achieved with a special ruler or freehand cutting. These alternatives offer creative expression beyond the standard methods, allowing quilters to personalize their projects and showcase their skills.
Exploring Different Binding Widths and Styles
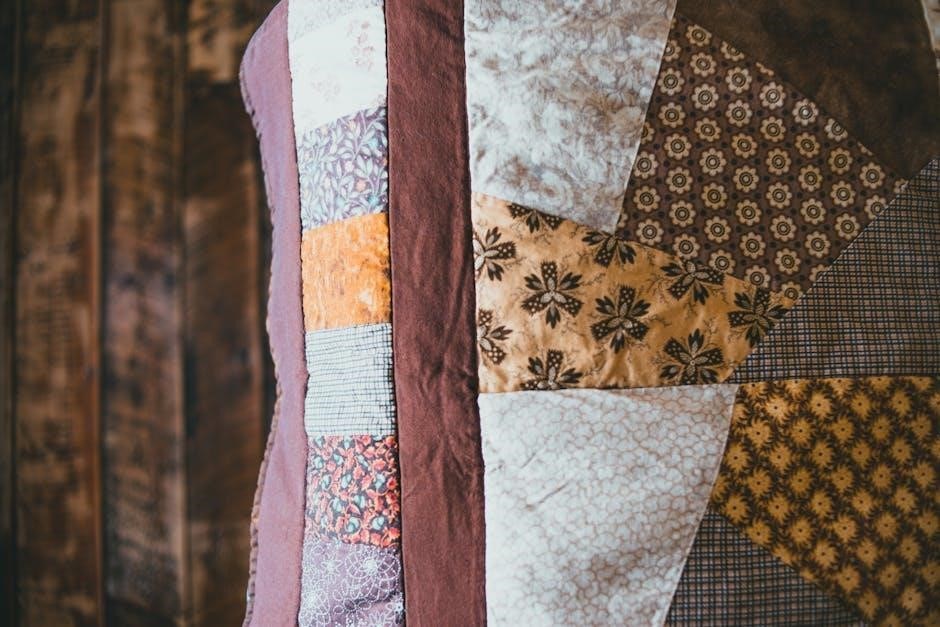
Binding width significantly impacts a quilt’s aesthetic. Standard double-fold binding typically uses 2.5-inch strips, offering a balanced look for most quilts. Narrower binding, around 2.25 inches, creates a more delicate frame, ideal for modern designs or quilts with intricate piecing.
Wider binding, such as 2.75 or 3 inches, adds substantial visual weight and can be particularly effective on larger quilts or those with bold patterns. Beyond width, binding style offers further customization. Straight-grain binding is common, but bias binding, cut on the diagonal, provides greater flexibility for curved edges and prevents warping.
Scalloped binding, achieved with a special ruler, introduces a playful touch. Quilters also experiment with contrasting binding fabrics to highlight quilt blocks or create a dynamic border. Ultimately, selecting the appropriate width and style enhances the overall design and showcases the quilter’s artistic vision.
Self-Binding Method: A Simplified Approach
The self-binding method, showcased in Missouri Star Quilt Co. tutorials, offers a streamlined finish, particularly suited for smaller projects like baby quilts or table runners. This technique eliminates the need for separate binding fabric; instead, the quilt backing extends beyond the quilt top and is turned to the front, creating a finished edge.
It’s a fantastic option for beginners or those seeking a quicker alternative to traditional binding. Precise cutting of the backing fabric is crucial – typically adding several inches to all sides of the quilt top. The extended backing is then folded over, mitering the corners for a neat appearance.
Jenny Doan’s tutorials emphasize careful pressing to ensure crisp folds and a professional look. While self-binding may not be ideal for heavily quilted projects or quilts requiring significant structure, it provides a clean, simple, and efficient finishing touch. It’s a testament to resourceful quilting!
Troubleshooting Common Binding Issues
Even with Missouri Star Quilt Co.’s detailed tutorials, quilters sometimes encounter challenges during the binding process. A frequent issue is wavy binding, often caused by stretching the fabric while sewing – maintaining consistent tension is key. Another common problem is mismatched corners; precise mitering and accurate ¼-inch seam allowances are vital for a seamless finish.
Bulky corners can occur with thick batting or multiple layers; carefully trimming the corner before folding and sewing helps alleviate this. If your binding is too short, creatively piecing additional strips, as demonstrated in some tutorials, can save the project. Conversely, excess binding can be trimmed neatly after joining the ends.
Finally, uneven binding width can be corrected by carefully adjusting the sewing line. Remember to press frequently throughout the process! Missouri Star’s resources often address these issues, offering practical solutions for a beautifully bound quilt.
Resources: Links to Missouri Star Tutorials
Missouri Star Quilt Co. offers a wealth of free binding tutorials on their website and YouTube channel, making it easy to learn and refine your skills. For a comprehensive overview, start with Jenny Doan’s “Ultimate Binding Tutorial,” which covers both machine and hand binding techniques.
Specifically, explore tutorials demonstrating the use of the Debs Binding Tool, a popular aid for quick and accurate binding application. Many quilters praise this method as a “no brainer” for achieving professional results. You can find numerous videos showcasing different approaches to mitered corners and joining binding ends.
Don’t forget to check out the Quilts By Me community platform, where quilters share their finished projects and offer helpful tips. Missouri Star frequently links to these resources, providing a supportive learning environment. These links provide a fantastic starting point for mastering quilt binding!
Quilts By Me: Sharing Your Finished Projects
Quilts By Me is a vibrant online community fostered by Missouri Star Quilt Co., providing a platform for quilters to showcase their completed projects, including those utilizing Missouri Star’s binding tutorials. It’s a fantastic space to gain inspiration and connect with fellow enthusiasts.
Sharing your quilts allows you to receive constructive feedback on your binding techniques, corner finishes, and overall craftsmanship. Many users specifically highlight their experiences with the Debs Binding Tool and Jenny Doan’s methods, creating a valuable resource for others.
By posting photos and details about your quilts, you contribute to a growing library of examples, demonstrating the versatility of Missouri Star’s tutorials. It’s a wonderful way to celebrate your accomplishments and encourage others on their quilting journey. Don’t hesitate to create a profile and show off your beautiful work!