Anilip3 and UltraScenery2 enhance DAZ Studio, while activewear sets and UltraScenery offer creative options; this manual aids 2014 F-150 maintenance․
What is a Service Manual?
A 2014 Ford F-150 service manual is a comprehensive, technically detailed guide created specifically for automotive technicians and mechanically inclined owners․ It’s far more than a simple owner’s manual; it delves into the intricate workings of the vehicle, providing step-by-step instructions, diagrams, and specifications for virtually every repair and maintenance procedure․
Think of it as the definitive resource for understanding, diagnosing, and fixing issues with your F-150․ Like the tools used in DAZ Studio for animation – Anilip3 and UltraScenery2 – a service manual provides the necessary “tools” (information) to tackle automotive challenges․ It covers everything from routine maintenance like oil changes and brake pad replacements to complex repairs involving the engine, transmission, or electrical systems․ It’s essential for anyone wanting to perform self-service or understand professional repairs․
Why You Need a 2014 F-150 Service Manual
Owning a 2014 Ford F-150 service manual empowers you to take control of your vehicle’s maintenance and repair costs․ While tools like UltraScenery enhance virtual landscapes, this manual enhances your understanding of a real-world machine․ It prevents costly mistakes by providing accurate procedures and torque specifications, avoiding potential damage․
Furthermore, it allows for informed decisions when discussing repairs with a mechanic, ensuring you aren’t being overcharged or misled․ Just as Anilip3 brings characters to life, a service manual brings your F-150’s mechanics to your understanding․ It’s invaluable for DIY enthusiasts, professional technicians, or anyone seeking a deeper connection with their vehicle, offering peace of mind and long-term savings․

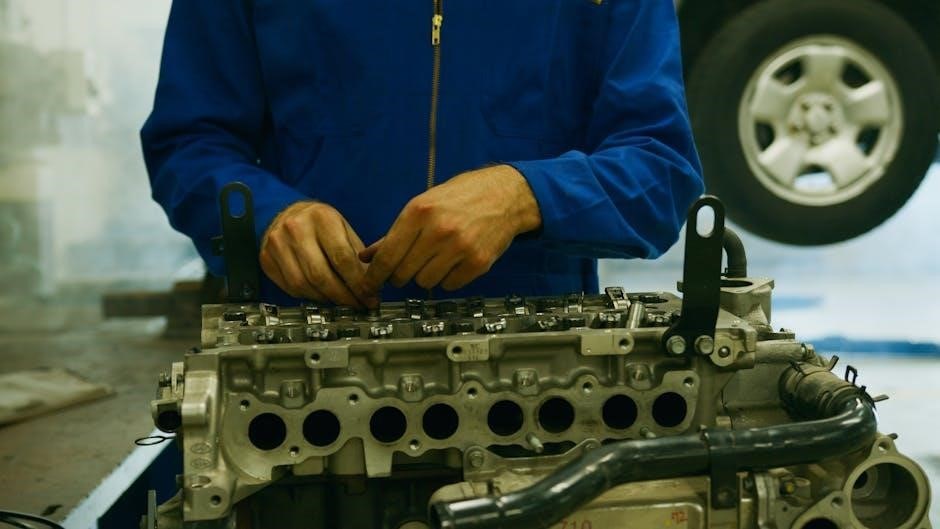
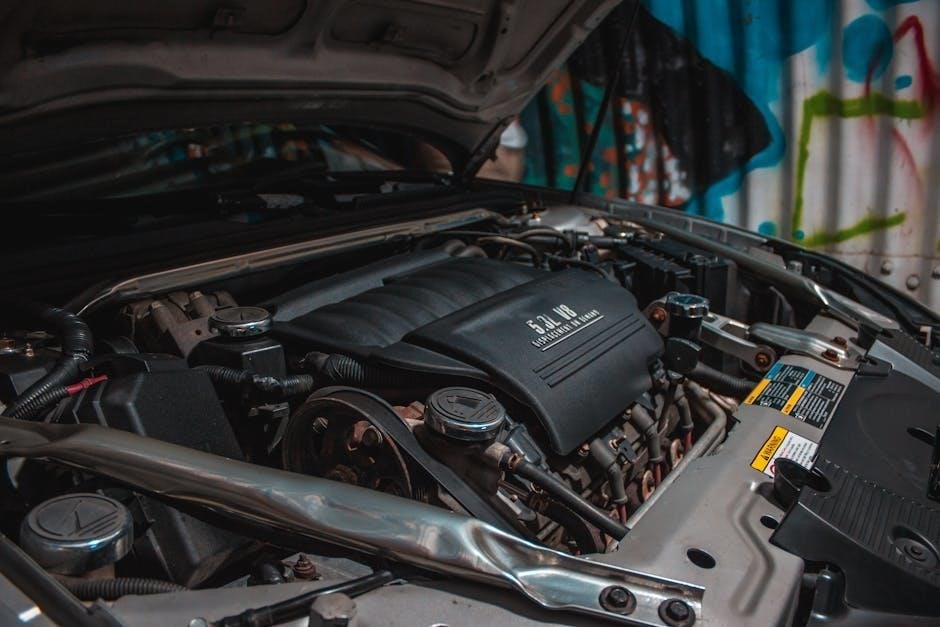
Engine Specifications & Repair
Like UltraScenery2’s detailed landscapes, this section details the 2014 F-150’s engine options – 3․7L, 5․0L, and 6․2L – alongside repair guidance․
2014 F-150 Engine Options Overview
The 2014 Ford F-150 offered a diverse range of engine choices, catering to various needs from efficient work to substantial towing capacity․ The base engine was a 3․7L V6, providing a balance of power and fuel economy for everyday use․ Stepping up, the popular 5․0L V8 delivered increased horsepower and torque, ideal for those requiring more robust performance․
For demanding tasks, the 6․2L V8 stood as the top-tier option, boasting significant power and capability․ Each engine option paired with a six-speed automatic transmission, optimizing performance and efficiency․ Understanding these specifications is crucial for accurate diagnostics and repairs, much like appreciating the detail in UltraScenery2’s landscapes or the lifelike animation from Anilip3․ Proper identification of the engine is the first step in any service procedure, ensuring the correct parts and procedures are utilized․

Common Engine Problems & Troubleshooting
The 2014 Ford F-150 engines, while generally reliable, exhibit certain common issues․ The 3․7L V6 is sometimes prone to timing chain issues, manifesting as rattling noises․ The 5․0L V8 can experience spark plug fouling and camshaft phaser problems, leading to rough running․ The 6․2L V8 occasionally suffers from exhaust manifold leaks and issues with the fuel injectors․
Troubleshooting often begins with a diagnostic scan for trouble codes․ Visual inspections for leaks, damaged wiring, and worn components are essential․ Like meticulously detailing a Quoll model or perfecting UltraScenery, careful diagnosis is key․ Addressing these issues promptly prevents further damage, ensuring continued performance and reliability, similar to the precision needed for Anilip3 lip-syncing․
Detailed Engine Repair Procedures (3․7L, 5․0L, 6․2L)
Repairing the 3․7L V6 often involves timing chain replacement, requiring specialized tools and precise alignment․ The 5․0L V8’s camshaft phaser issues necessitate careful disassembly and component replacement, ensuring proper torque specifications․ For the 6․2L V8, exhaust manifold repairs demand heat shield removal and gasket replacement․
Each engine requires specific procedures, detailed within this manual, mirroring the intricacy of UltraScenery2 landscapes or the realism of Anilip3 animations․ Always disconnect the battery before electrical work․ Like crafting detailed DAZ Studio scenes, meticulous attention to detail and adherence to torque specs are crucial for successful engine repair, ensuring optimal performance and longevity․
Transmission Service & Repair
Like UltraScenery’s detailed landscapes, the 2014 F-150’s transmissions—automatic and manual—demand precise service, mirroring Anilip3’s animation accuracy for optimal function․
Transmission Types in the 2014 F-150
The 2014 Ford F-150 offered a variety of transmission options, largely dependent on the engine choice and drivetrain configuration․ The most prevalent was the 6R75E six-speed automatic transmission, a robust unit known for its durability and smooth shifting characteristics․ This transmission was paired with both the 3․7L V6, 5․0L V8, and the 6․2L V8 engines․
A 6R60E six-speed automatic was also available, primarily coupled with the 3․7L V6 in certain configurations․ For those seeking a more traditional driving experience, a six-speed manual transmission (M66) was offered, exclusively with the 5․0L V8 engine․ Understanding which transmission your F-150 is equipped with is crucial for proper maintenance and repair, much like knowing the specific ecology within UltraScenery2 for accurate rendering․
Automatic Transmission Fluid Change Procedure
Performing a fluid change on the 2014 F-150’s 6R75E or 6R60E automatic transmission is vital for longevity․ Begin by warming the engine, then safely raise the vehicle․ Locate the transmission pan and drain plug; carefully remove the plug, allowing the fluid to drain completely․ Replace the pan gasket and filter – a crucial step often overlooked, similar to updating ecologies in UltraScenery2 for optimal results․
Reinstall the pan, torque to specification, and then add the correct type and quantity of Mercon LV fluid, checking the level with the engine running and in park․ Like ensuring lifelike fur on a 3D Quoll model, precision is key․ Improper fluid levels can cause shifting issues or damage․
Manual Transmission Repair & Overhaul
Overhauling the 2014 F-150’s manual transmission (typically the M5OD-R2) requires specialized tools and a clean workspace․ Begin by disconnecting the driveshaft and removing the transmission․ Thoroughly inspect all gears, synchros, and bearings for wear, referencing detailed diagrams․ Replacing worn components is essential, much like updating UltraScenery for realistic landscapes․
Pay close attention to the shift linkage and ensure proper alignment during reassembly․ Like achieving perfect Anilip3 lip-sync, precision is paramount․ Proper lubrication with the correct gear oil is critical․ A rebuild kit often includes necessary seals and gaskets, ensuring a reliable repair, similar to a complete activewear set․

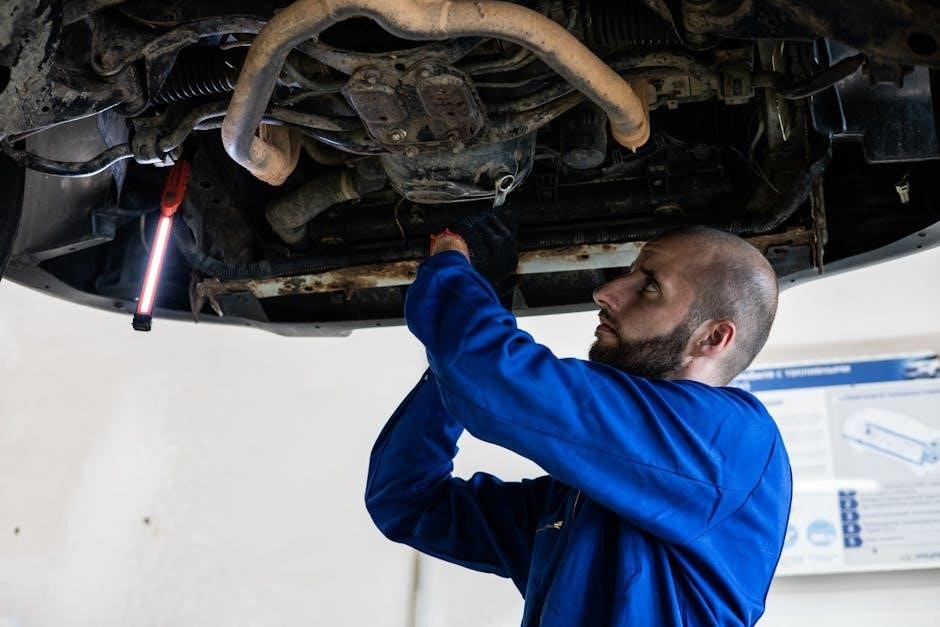
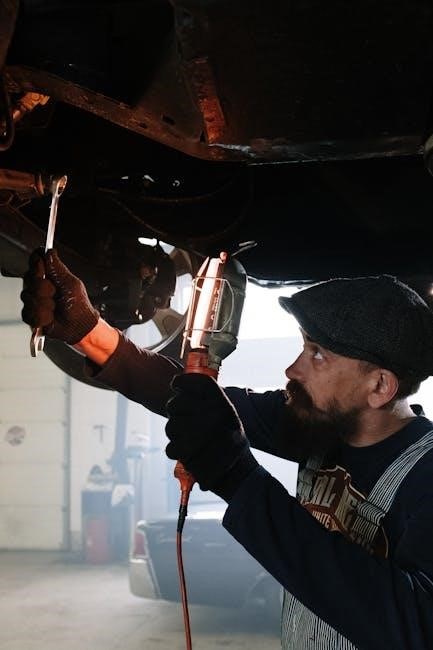
Braking System Maintenance
Like detailed UltraScenery landscapes or precise Anilip3 animations, maintaining the 2014 F-150’s braking system ensures safety and optimal performance for every journey․
Brake Pad Replacement Guide
Preparation is key: Gather new brake pads (matching your F-150’s trim), brake cleaner, a C-clamp, and appropriate tools․ Begin by safely lifting the vehicle and removing the wheel․ Inspection: Examine the brake rotor for wear or damage – replace if necessary, mirroring UltraScenery2’s detail․
Removal: Disconnect the brake pad wear sensor․ Remove the caliper bolts and carefully slide the caliper off the rotor․ Compress the caliper piston using a C-clamp, similar to the precision of Anilip3 lip-sync․ Remove the old brake pads;
Installation: Clean the caliper bracket with brake cleaner․ Install the new brake pads, ensuring proper orientation․ Reinstall the caliper and tighten the bolts to the specified torque․ Reconnect the wear sensor and reinstall the wheel․ Pump the brakes to restore pressure, just as UltraScenery builds landscapes․
Brake Rotor Inspection & Replacement
Rotor Inspection: Carefully examine the brake rotor surface for scoring, cracks, or excessive rust – akin to assessing UltraScenery’s terrain detail․ Measure rotor thickness; if it’s below the manufacturer’s specification, replacement is crucial․ Warping, indicated by pulsation during braking, also necessitates replacement, demanding precision like Anilip3’s animations․
Removal: Remove the caliper and brake pads (refer to the pad replacement guide)․ Detach the rotor from the hub; it may require gentle tapping․ Clean the hub surface thoroughly․
Installation: Mount the new rotor onto the hub, ensuring it sits flush․ Reinstall the caliper and brake pads․ Torque all bolts to the manufacturer’s specifications․ Following this process ensures optimal braking performance, mirroring the quality of UltraScenery2’s ecologies․
ABS System Diagnostics & Repair
Diagnostic Scan: Utilize an OBD-II scanner to retrieve ABS trouble codes – similar to troubleshooting issues within DAZ Studio․ Common codes indicate wheel speed sensor failures, module malfunctions, or hydraulic issues․ Analyze the codes carefully to pinpoint the source of the problem, demanding focus like AprilYSH’s 3D modeling․
Wheel Speed Sensor Check: Inspect wheel speed sensors for damage or corrosion․ Test sensor resistance and signal output․ Replace faulty sensors․
Module & Hydraulic Repair: If the ABS module is faulty, replacement is often necessary․ Bleed the ABS system after any hydraulic component repair, ensuring proper fluid levels․ This meticulous process parallels the detail in UltraScenery landscapes․

Suspension & Steering
Like crafting detailed UltraScenery, maintaining the 2014 F-150’s suspension and steering ensures optimal handling and a smooth, controlled driving experience․
Front Suspension Component Replacement
Replacing front suspension components on a 2014 Ford F-150 requires careful attention to detail and adherence to proper torque specifications․ This procedure often begins with safely lifting the vehicle and supporting it with jack stands, ensuring stability․ Common components needing replacement include ball joints, tie rod ends, control arms, and shock absorbers․
Before disassembly, it’s crucial to disconnect the ABS sensor and brake lines, taking precautions to prevent fluid loss․ Specialized tools, like a ball joint separator, may be necessary․ After removing the old components, thoroughly inspect the surrounding areas for wear or damage․ When installing new parts, apply a light coating of grease to ensure smooth operation and prevent premature failure․ Finally, perform a wheel alignment after completing the replacement to guarantee proper handling and tire wear․ Remember safety first!
Rear Suspension Component Replacement
The rear suspension of a 2014 Ford F-150, like the front, demands precise replacement procedures․ Begin by securely lifting the truck and supporting it with robust jack stands․ Common replacements involve leaf spring bushings, shock absorbers, and U-bolts․ Inspecting for rust and corrosion is paramount, potentially requiring penetrating oil for disassembly․
Carefully disconnect the brake lines and ABS sensors, protecting them from damage․ When removing leaf springs, support the axle to prevent sudden drops․ New U-bolts should always be used, tightened to the manufacturer’s specifications․ After installation, thoroughly check all connections and ensure proper torque․ A rear-end alignment is often recommended, especially after leaf spring replacement, to maintain vehicle stability and prevent uneven tire wear․ Prioritize safety throughout the process․
Steering System Inspection & Adjustment
A thorough inspection of the 2014 F-150’s steering system is crucial for safe operation․ Begin by checking for play in the steering wheel, indicating potential issues with tie rod ends, ball joints, or the steering gearbox․ Inspect the power steering fluid level and hoses for leaks or damage․ Examine the steering linkage for worn or damaged components․
Adjustment typically involves aligning the steering wheel to ensure it’s centered when driving straight․ This may require adjusting tie rod sleeves․ Always consult the service manual for specific torque specifications․ If excessive play persists, components likely need replacement․ Remember to perform a wheel alignment after any steering system adjustments or repairs to guarantee proper handling and tire wear․ Prioritize safety and accurate measurements․
Electrical System Troubleshooting
Anilip3, UltraScenery2, and UltraScenery tools inspire creativity; this manual guides 2014 F-150 electrical diagnostics, utilizing wiring diagrams and fuse box locations․
Battery & Charging System Diagnostics
Diagnosing the 2014 Ford F-150’s battery and charging system requires a systematic approach․ Begin with a visual inspection of the battery terminals for corrosion, ensuring a secure connection․ Utilize a multimeter to check the battery’s voltage; a fully charged battery should read approximately 12․6 volts․
Next, assess the alternator’s output while the engine is running․ The alternator should produce between 13․5 and 14․5 volts․ Low voltage indicates a potential alternator issue, while excessively high voltage suggests a voltage regulator malfunction․ Further testing involves checking the charging system’s fuses and wiring for continuity․
Remember that tools like Anilip3 and UltraScenery2, while creative, are unrelated to automotive repair․ Proper diagnostic procedures, combined with the service manual’s wiring diagrams, are crucial for accurate troubleshooting and repair of the F-150’s electrical components․
Wiring Diagrams & Component Locations
The 2014 Ford F-150 service manual provides detailed wiring diagrams essential for tracing electrical circuits and identifying component locations․ These diagrams illustrate the complex network of wires, connectors, and modules within the vehicle․ Component locations are clearly depicted, showing where each electrical part – from the battery to the body control module – is situated within the chassis and cabin․
Understanding these diagrams is vital for accurate troubleshooting and repair․ The manual’s illustrations help pinpoint specific wires and connectors, simplifying the process of diagnosing electrical faults․ While tools like UltraScenery enhance visual environments, the service manual focuses on the F-150’s internal workings․
Always refer to the correct diagram for your specific F-150 configuration, as options and features can affect wiring layouts․
Fuse Box Locations & Diagrams
The 2014 Ford F-150 service manual dedicates significant detail to fuse box locations and diagrams․ Typically, the F-150 features at least two fuse boxes: one located in the passenger compartment and another within the engine compartment․ Each fuse is meticulously documented, with diagrams illustrating the specific circuits they protect․
These diagrams are crucial for identifying blown fuses and restoring functionality to various vehicle systems․ The manual clarifies the purpose of each fuse, preventing incorrect replacements that could cause further damage․ Like understanding Anilip3’s animation process, knowing the fuse layout is fundamental․

Proper fuse identification and replacement are essential for safe and effective electrical repairs․ Always consult the manual before attempting any electrical work․
Body & Chassis Repair
UltraScenery2 and Quoll models demonstrate detailed design; similarly, this section of the 2014 F-150 manual covers panel replacement and frame integrity․
Body Panel Replacement Procedures
Detailed guidance is crucial for successful body panel repairs on your 2014 Ford F-150․ This section outlines step-by-step procedures, beginning with damage assessment and concluding with refinishing techniques․ First, safely disconnect the battery to prevent electrical shorts․ Then, carefully remove any associated components – lights, trim, and moldings – documenting their locations for reassembly․
Next, utilize appropriate tools to detach the damaged panel, paying attention to spot welds and adhesive bonding․ Clean the underlying structure thoroughly, removing rust or corrosion․ When installing the new panel, ensure proper alignment and secure it using the original attachment methods․ Finally, prepare the surface for painting, applying primer, base coat, and clear coat for a seamless finish․ Remember to consult wiring diagrams when dealing with panels housing electrical components, mirroring the precision of UltraScenery2’s detailed ecologies;
Frame Damage Inspection & Repair
A compromised frame severely impacts vehicle safety; therefore, meticulous inspection is paramount․ Begin by visually examining the frame rails for bends, cracks, or signs of previous repair․ Utilize specialized measuring tools to verify frame straightness against factory specifications․ Any deviation exceeding allowable tolerances necessitates repair or, in severe cases, frame replacement․
Repair options range from minor straightening using hydraulic jacks and pulling equipment to sectioning and splicing damaged areas․ Welding must be performed by a certified technician to maintain structural integrity, akin to the detailed work in UltraScenery landscapes․ Always prioritize safety and adhere to Ford’s recommended procedures․ Following repair, a thorough inspection and alignment are essential, ensuring the vehicle handles like new, mirroring the lifelike quality of Anilip3 animations․
Corrosion Prevention & Repair
Rust is a significant threat to the longevity of a 2014 Ford F-150, particularly in regions with harsh climates․ Proactive prevention is key, involving regular washing, waxing, and application of undercoating to protect exposed metal surfaces – much like preserving the detail in UltraScenery2 landscapes․
When corrosion appears, immediate attention is crucial․ Remove loose rust with wire brushes or abrasive discs, then apply rust converter to neutralize remaining corrosion․ Prime the area and repaint with a durable automotive finish․ For severe cases, panel replacement might be necessary, demanding precision akin to Anilip3’s lip-sync accuracy․ Remember, addressing corrosion promptly prevents further damage and maintains the vehicle’s structural integrity, ensuring safety and value, similar to the quality of DAZ Studio assets․